A durable concrete repair starts with deciding what must be removed and what can remain. Removal is not an end in itself: the boundary, method and depth follow the assessment and repair design. Removing too little may leave weak material; aggressive chipping, sawing or blasting can damage sound concrete and reinforcement. [1, 2]
Which removal method fits?
Hand tools and light breakers offer control in small areas but take longer for larger volumes. Hydraulic or electric breakers can be more productive but require attention to vibration and damage to remaining concrete or steel. Hydrodemolition removes concrete with high-pressure water and can preserve reinforcement, but requires suitable drainage, water control and equipment. Blasting, milling or grinding is often used to remove contamination, laitance or a surface layer; it does not replace assessment of deeper delamination. [1]
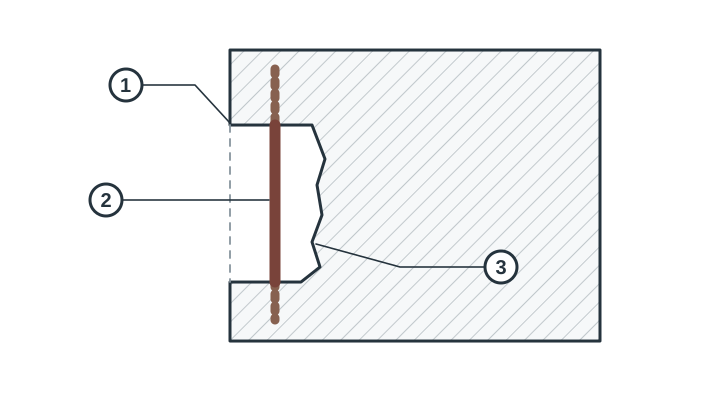 After selective removal. 1. Repair boundary. 2. Exposed reinforcement. 3. Remaining concrete for assessment before repair.
Prepare in stages
- Inspect and mark. Map the damage through visual inspection and, where needed, sounding, measurements or further investigation. Set boundaries to match the diagnosed deterioration and design.
- Remove selectively and safely. Select tools based on extent, access, reinforcement, vibration sensitivity and surroundings. Follow the work plan and avoid cutting or bending exposed bars.
- Assess the exposed area. After removal, check that the substrate is sound and that actual conditions match assumptions. Consult the designer if conditions differ, or unexpected corrosion or section loss appears.
- Clean and profile. Remove dust, slurry, oil and loose particles. Required roughness and moisture depend on the repair material and system. A profile suitable for one product is not automatically suitable for another.
- Accept before repair. Record substrate condition, dimensions, reinforcement, moisture and deviations. Release the work under the inspection plan before placing repair material.
How is preparation checked?
Visual inspection and sounding can indicate loose areas; they do not automatically prove that removal is deep enough or the surface suits every product. The specification may require profile references, pull-off tests, cleanliness checks or hold points. Select inspection methods and any limits for the project. Photograph the area after removal and before repair. [1, 2]
Ask how the removal boundary was set; which method protects reinforcement; who accepts the exposed area; what happens if damage extends further; and which profile and moisture condition the selected repair material requires.
See also concrete patch repair, shotcrete repair and repair and protect reinforcement.
Sources
- FHWA, Partial-Depth Repairs, §4.3. Concrete pavement example covering removal methods and protection of sound concrete. FHWA.
- Cerema, Protection du béton, practical factsheet, February 2021, pp. 9–12: visual assessment, mapping, further diagnosis and suitability of concrete before surface protection and repair. PDF.
- ACI Committee E706, Concrete Removal Using Hydrodemolition, ACI RAP-14, scope, terms and applications. PDF.